[개요]
‘아파치 루신(Apache Lucene)’ 기반의 검색 엔진이다. 실시간 검색을 제공한다. 검색 기능뿐만 아니라 강력한 집계 기능을 제공해 실시간 분석 엔진으로도 활용 가능하다.
[설치 방법]
1. Zulu OpenJDK 8 설치
[root@localhost ~]# rpm --import http://repos.azulsystems.com/RPM-GPG-KEY-azulsystems
[root@localhost ~]# curl -o /etc/yum.repos.d/zulu.repo http://repos.azulsystems.com/rhel/zulu.repo
[root@localhost ~]# yum -y install zulu-8
[root@localhost ~]# bash -c 'echo "export JAVA_HOME=/usr/lib/jvm/zulu-8" >> /etc/environment'
[root@localhost ~]# bash -c 'echo "export JRE_HOME=/usr/lib/jvm/zulu-8/jre" >> /etc/environment'
2. Elasticsearch 6 설치
[root@localhost ~]#  rpm --import https://artifacts.elastic.co/GPG-KEY-elasticsearch
[root@localhost ~]#  touch /etc/yum.repos.d/elasticsearc-6.repo
[root@localhost ~]#  bash -c 'echo "[elasticsearch-6.x]" >> /etc/yum.repos.d/elasticsearc-6.repo'
[root@localhost ~]#  bash -c 'echo "name=Elasticsearch repository for 6.x packages" >> /etc/yum.repos.d/elasticsearc-6.repo'
[root@localhost ~]#  bash -c 'echo "baseurl=https://artifacts.elastic.co/packages/6.x/yum" >> /etc/yum.repos.d/elasticsearc-6.repo'
[root@localhost ~]#  bash -c 'echo "gpgcheck=1" >> /etc/yum.repos.d/elasticsearc-6.repo'
[root@localhost ~]#  bash -c 'echo "gpgkey=https://artifacts.elastic.co/GPG-KEY-elasticsearch" >> /etc/yum.repos.d/elasticsearc-6.repo'
[root@localhost ~]#  bash -c 'echo "enabled=1" >> /etc/yum.repos.d/elasticsearc-6.repo'
[root@localhost ~]#  bash -c 'echo "autorefresh=1" >> /etc/yum.repos.d/elasticsearc-6.repo'
[root@localhost ~]#  bash -c 'echo "type=rpm-md" >> /etc/yum.repos.d/elasticsearc-6.repo'
[root@localhost ~]#  yum -y install elasticsearch

위에 내용과 다르게 아래 내용으로 가능
[root@localhost ~]#  rpm --import https://artifacts.elastic.co/GPG-KEY-elasticsearch
[root@localhost ~]#  vi /etc/yum.repos.d/elasticsearc-6.repo

## 아래 내용 입력 ##
[elasticsearch-6.x]
name=Elasticsearch repository for 6.x packages
baseurl=https://artifacts.elastic.co/packages/6.x/yum
gpgcheck=1
gpgkey=https://artifacts.elastic.co/GPG-KEY-elasticsearch
enabled=1
autorefresh=1
type=rpm-md

## install 실행 ##
[root@localhost ~]#  yum -y install elasticsearch
3. Elasticsearch 6 환경 설정
[root@localhost ~]# vi /etc/elasticsearch/elasticsearch.yml
- 아래 내용과 같이 Cluster.name 변경 및 주석 해제

### Elasticsearch 6 방화벽 개방
[root@localhost ~]#  firewall-cmd --permanent --add-port=9200/tcp
[root@localhost ~]#  firewall-cmd --permanent --add-port=9300/tcp
[root@localhost ~]#  firewall-cmd --reload

### Elasticsearch 6 실행
[root@localhost ~]#  systemctl daemon-reload
[root@localhost ~]#  systemctl enable elasticsearch
[root@localhost ~]#  systemctl start elasticsearch
4. 실행 확인
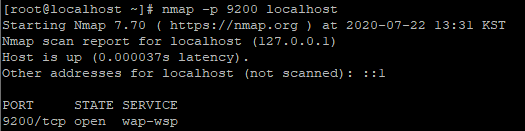
[root@localhost ~]# nmap -p 9200 localhost
- 아래 그림과 같이 Port Open 확인
[root@localhost ~]# curl -X GET http://localhost:9200
- cluster_name 확인

인용 사이트 : https://jsonobject.tistory.com/482
'Linux' 카테고리의 다른 글
| [Ubuntu 22.04]VMWare Tool 설치 방법 (0) | 2023.07.25 |
|---|---|
| [CentOS]rsyslog 설치(클라이언트용) (0) | 2020.07.22 |
| [CentOS 8]시간 동기화 방법 (0) | 2020.07.21 |
| [CentOS]리눅스 부팅 USB 만들기 (0) | 2020.07.06 |
| [CentOS 7]Zabbix 3.2 -> 4.0 업그레이드 (0) | 2020.06.24 |

